Force Quit Mac computers are widely known for their reliability and smooth performance, yet even the most optimized systems can experience occasional freezes or unresponsive applications. Force Quit Mac an application is a critical skill for every Mac user because it allows you to regain control of your computer without waiting for the system to unfreeze on its own. This guide will cover every possible scenario, from the simplest keyboard shortcuts to advanced techniques like using Terminal and Activity Monitor, along with tips to prevent future freezes. Mastering these techniques ensures you can handle any situation efficiently, preserve system health, and protect unsaved work.
Understanding What “Force Quit” Really Does on macOS
Force quitting is often misunderstood by casual users. Unlike closing an application normally, which allows the program to save data, release system resources, and close gracefully, force quitting bypasses all of these safety measures. When you Force Quit Mac, macOS immediately terminates the process in memory. This abrupt termination can result in unsaved changes being lost and temporary files not being cleaned up. Understanding this distinction is important because it allows you to make informed decisions about when to use force quit and when alternative methods might be safer.
Applications freeze due to various reasons: memory exhaustion, CPU overload, corrupted cache files, or conflicts with background services. Sometimes the app itself is fine, but its user interface thread becomes unresponsive, which can make the app appear locked even though it’s still processing tasks in the background. Recognizing this distinction helps you decide the appropriate method. For example, if an app appears frozen but the cursor is moving, using Activity Monitor to quit the process may be safer than immediately performing a force restart. Power users should also be aware of how macOS handles system and user-level processes, as terminating the wrong process can disrupt other applications or system functions.
Common Reasons Apps Freeze on Mac
Applications can freeze for many reasons, and understanding these can help you prevent future occurrences. Common causes include insufficient memory, excessive CPU usage, buggy code, incompatible extensions, and software conflicts. Memory leaks in poorly optimized applications can accumulate over time, gradually consuming all available RAM and causing the system to slow down or freeze. CPU-intensive apps, such as video editors, design tools, or multiple browser tabs with heavy JavaScript, may temporarily become unresponsive if system resources are maxed out.
Corrupted cache or preference files can also lead to repeated freezes in certain applications. Sometimes the app tries to access data that has been moved or deleted, causing it to hang. Additionally, third-party extensions or plugins, especially in browsers or productivity apps, can interfere with normal operations and trigger freezing. Even macOS updates can introduce compatibility issues if the app hasn’t been updated. Knowing these causes is useful because preventive measures—such as closing unnecessary applications, managing startup items, clearing caches, or updating software regularly—can reduce the need for force quitting.
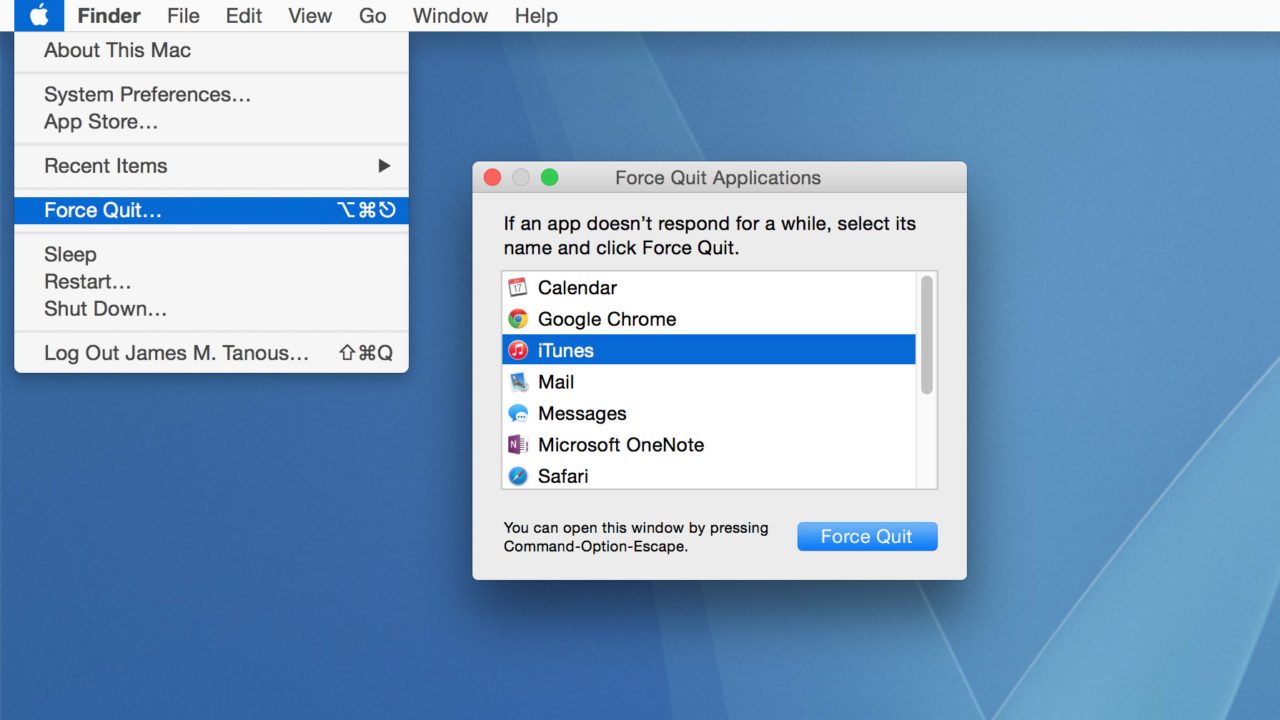
The Fastest Keyboard Shortcut to Force Quit Apps
The fastest and most universal way to Force Quit Mac an unresponsive app on Mac is by using the keyboard shortcut: Option + Command + Escape. Pressing these keys together instantly opens the Force Quit Applications window, displaying all running apps. From this window, you can select the frozen application and click “Force Quit” to terminate it immediately. This method works regardless of which application is currently in focus, making it ideal for quick intervention.
The shortcut is particularly effective because it allows you to bypass the graphical interface of the frozen application. Unlike navigating through menus or the Dock, this combination works even when part of the UI is unresponsive. For users who rely on efficiency and keyboard navigation, memorizing this shortcut is essential. However, it’s important to remember that using this method abruptly stops the app, so any unsaved changes may be lost. This shortcut is best suited for situations where waiting for a normal quit is impractical, or when the application is completely frozen and unresponsive to mouse input.
When the Keyboard Shortcut Does Not Appear
There are rare occasions when pressing Option + Command + Escape fails to bring up the Force Quit Mac Applications window. This typically occurs if the system is under heavy load, or if the keyboard input is delayed or not recognized due to a temporary freeze of the operating system. In such cases, repeatedly pressing the keys may not help and could further exacerbate system lag. Instead, it is recommended to try alternative methods such as using the Apple menu or accessing the Dock for force quitting.
Waiting a few seconds can allow macOS to catch up, especially on older systems with slower processors or limited RAM. Additionally, ensuring that your keyboard is functioning correctly—checking connections for wired keyboards or Bluetooth pairing for wireless devices—can resolve issues when shortcuts appear unresponsive. If the system remains unresponsive even after attempting these methods, advanced approaches like using Activity Monitor or Terminal may be necessary to regain control.
Using the Apple Menu to Force Quit
The Apple menu provides a straightforward alternative for terminating frozen applications. By clicking the Apple logo in the top-left corner of the screen and selecting “Force Quit,” the same Force Quit Applications window that appears with the keyboard shortcut is displayed. This approach is particularly helpful for users who are unfamiliar with keyboard shortcuts or prefer navigating visually.
Using the Apple menu method is intuitive and also provides a clear list of all currently running applications, allowing users to identify and terminate multiple apps if needed. This method is ideal for beginners, as it eliminates the need to memorize shortcuts or navigate complex menus. Additionally, it works well in situations where a partially responsive app may still allow menu navigation, making it a safer first choice compared to immediately using force restart.
Force Quit Mac Directly from the Dock
Another efficient method to terminate unresponsive applications is through the Dock. Holding the Option key while right-clicking (or Control-clicking) an application icon in the Dock displays the Force Quit Mac option if the app is running. This method is especially useful when only one application is frozen, and the rest of the system remains responsive.
Using the Dock provides a visual representation of active applications, which helps identify the exact app that is causing issues. This approach is convenient because it does not require opening additional windows or applications, and it works even if the application’s interface is completely frozen. It is also ideal for users who prefer using the mouse over keyboard shortcuts. Combining the Dock method with Option key ensures that you force quit the application without affecting others.
Using Activity Monitor for Precise Control
Activity Monitor is the macOS system utility that provides in-depth insights into all running processes. Unlike the Force Quit Mac window, Activity Monitor allows you to monitor CPU, memory, energy, disk, and network usage for every process. This makes it possible to identify the exact source of freezes, including background processes that are not visible in the Dock or Force Quit window.
Within Activity Monitor, users can select a process and choose between “Quit” and “Force Quit.” Quitting attempts a graceful termination, while Force Quit Mac immediately kills the process. This level of precision is particularly useful for advanced users, developers, or IT professionals who need to manage multiple processes efficiently. Activity Monitor also enables users to monitor system resource consumption over time, helping prevent future freezes by managing high-memory applications or background services.
Identifying Problematic Processes in Activity Monitor
Not all frozen applications are immediately obvious. Some processes continue consuming resources in the background even after the app interface closes. Activity Monitor allows sorting processes by CPU, memory, or energy usage, enabling users to quickly identify which processes are causing system slowdowns or freezes. High CPU usage, excessive memory consumption, or continuous disk activity often points to the culprit application or service.
Advanced users can also monitor specific metrics such as thread count, process priority, and virtual memory usage to understand why a process is unresponsive. By identifying the correct process before force quitting, users can prevent inadvertently terminating critical system services or unrelated applications. This level of monitoring is essential for troubleshooting recurring issues and ensuring system stability.
Understanding Quit vs Force Quit in Activity Monitor
Activity Monitor differentiates between “Quit” and “Force Quit” actions. Quitting attempts a graceful shutdown of the application, allowing it to save open files and release system resources properly. Force Quit bypasses these steps, terminating the process immediately. Using the Quit option first is recommended whenever possible, as it minimizes the risk of data loss or system instability.
Understanding this distinction is critical for professional users who manage multiple applications simultaneously. For example, terminating a resource-heavy app that is unresponsive with Force Quit may solve an immediate problem but could also disrupt dependent processes. Therefore, assessing whether the app can respond to a normal Quit command is an important step before escalating to Force Quit Mac.
Using Terminal for Advanced Force Quit Operations
Terminal provides the most direct control over processes on macOS. Commands such as killall and kill allow users to target specific processes by name or process ID. Terminal is extremely powerful, enabling termination of stubborn processes that refuse to close through standard methods. This method is essential for IT professionals, developers, or power users dealing with complex system issues.
The killall command terminates all processes matching a specific name, which is useful for applications with multiple background components. The kill command provides precision by allowing users to target processes using their unique process IDs. Using Terminal commands requires caution, as terminating critical system processes can lead to system instability or crashes. Knowledge of proper command syntax and careful selection of target processes is essential for safe operation.
How killall Works
killall sends a termination signal to all instances of a process with the specified name. By default, it sends a graceful termination request, but it can also send a forceful termination signal to immediately stop processes that are unresponsive. This method is effective for apps that have multiple background threads or processes that cannot be closed through the graphical interface.
For example, using killall Safari will terminate all Safari processes, including background services, tabs, and extensions. Advanced users can specify additional options to customize signal types or target specific user-owned processes. Understanding how killall functions allows for rapid resolution of unresponsive applications while minimizing risk to other system components.
Using Process IDs for Precision
Process IDs (PIDs) provide a unique identifier for each running process. Using the kill command with a PID ensures that only the intended process is terminated, reducing the risk of inadvertently closing critical system components. Users can find PIDs in Activity Monitor or by using the ps command in Terminal.
This method is particularly useful when multiple processes share similar names or when troubleshooting complex system behavior. For example, if multiple instances of Chrome are running, using kill with the specific PID of the frozen instance ensures other instances remain unaffected. Mastery of PID-based termination is a professional-level skill that enables precise control over macOS processes.
Force Quitting the Finder
The Finder is macOS’s file management interface, responsible for navigating folders, managing files, and launching applications. Occasionally, Finder itself may become unresponsive, appearing frozen or failing to refresh the desktop. Unlike regular applications, Finder cannot be fully closed; instead, it can be relaunched to restore functionality. Relaunching Finder is effectively a controlled Force Quit Mac that allows the system to restart the process without impacting other running applications.
To relaunch Finder, access the Force Quit Mac Applications window via the keyboard shortcut or Apple menu, select Finder, and click “Relaunch.” This action immediately closes the frozen Finder interface and restarts it cleanly. Users may notice desktop icons disappearing momentarily and reappearing during this process, which is normal. For users dealing with frequent Finder freezes, the issue may stem from corrupted preference files or incompatible extensions. Deleting the Finder preference file and restarting the Mac often resolves recurring issues.
Advanced users can also relaunch Finder using Terminal commands, which can be especially helpful when the Force Quit window is unresponsive. Using the command killall Finder in Terminal terminates all Finder processes and triggers an automatic relaunch. This method provides a deeper level of control, ensuring that even background Finder components that may be causing freezes are addressed. Proper use of Finder relaunching techniques ensures minimal disruption to workflows while restoring full desktop functionality.
What to Do When Finder Refuses to Relaunch
In rare cases, even relaunching Finder may fail, leaving the desktop unresponsive. This can occur if system resources are heavily taxed, if Finder preference files are corrupted, or if incompatible extensions are loaded at startup. When this happens, advanced troubleshooting steps become necessary.
A practical first step is to restart the Mac. If a normal restart is not possible due to system freeze, a force restart may be required as a last resort. Once the system reboots, clearing Finder preferences and cache files can prevent recurring issues. Preferences can be deleted by navigating to ~/Library/Preferences/com.apple.finder.plist and removing the file. Restarting Finder after clearing these preferences often resolves stubborn issues.
Additionally, examining third-party Finder extensions, such as QuickLook plugins or file sync tools, is crucial. Disabling or updating these extensions may prevent further freezes. Using Terminal commands like killall Finder ensures the process terminates even when the GUI is unresponsive. By systematically addressing the root causes and using a combination of force relaunch, cache clearance, and extension management, users can maintain a stable Finder environment and avoid repeated interruptions.
When the Entire System Appears Frozen
Occasionally, the entire Mac may appear frozen, with neither keyboard nor mouse input being recognized. This situation is typically caused by extreme resource exhaustion, a hung system process, or software conflicts at the OS level. Understanding how to respond appropriately can prevent data loss and reduce the likelihood of corruption in system files.
When only partial responsiveness is observed, such as a moving cursor but unresponsive clicks, waiting a few seconds is often sufficient to regain control. If there is no response at all, advanced users can attempt to access Terminal or remote management tools to intervene. Force Quit Mac individual applications is ineffective in such cases, as the system may not process the termination commands.
Power users may also monitor system health indicators, such as memory pressure or CPU spikes, through Activity Monitor or remote monitoring utilities. These metrics help diagnose why the system froze and provide insight into whether a reboot or more targeted action is necessary. In critical environments, knowing how to perform a controlled shutdown or leveraging remote administrative access can safeguard important processes and data before performing a force restart.
Force Restart as a Last Resort
A force restart involves holding the power button until the Mac shuts down completely, followed by pressing it again to boot. This method forcibly terminates all running processes, including system-level processes, without allowing them to save state. It should only be used when all other methods, including Force Quit Mac, Activity Monitor, and Terminal commands, fail.
While effective in regaining control, force restarting carries risks. Active file writes may be interrupted, potentially corrupting open documents or system files. Unsaved work in applications is almost always lost. After a force restart, it is essential to check disk integrity using Disk Utility and verify that critical applications open and function correctly.
Force restart is a vital emergency tool for both casual users and professionals, but it should be approached with caution. Users can reduce the need for this drastic step by maintaining system health through regular updates, proper memory management, and monitoring high-risk applications. Knowing when to escalate to a force restart ensures that the method is used responsibly and minimizes long-term negative impact.
Risks Associated with Force Restart
Force restarting, while sometimes necessary, carries significant risks that users should understand. The abrupt termination of all processes bypasses normal shutdown protocols, which can lead to data loss, corrupted application states, or even rare file system inconsistencies. Applications performing active writes, such as video editing, database management, or document processing, are especially vulnerable.
Repeated or frequent force restarts can also indicate underlying system issues, such as failing hardware, incompatible software, or persistent resource bottlenecks. It is crucial to address these root causes rather than relying solely on emergency restarts. After performing a force restart, users should verify system integrity using Disk Utility’s First Aid tool, review log files for unusual behavior, and ensure critical applications reopen correctly. Regular backups and cloud synchronization provide an additional safeguard against potential data loss.
Understanding the risks associated with force restart enables users to make informed decisions, balancing immediate system recovery with long-term data protection and system stability.
Preventing Frequent App Freezes
Preventing application freezes is far better than repeatedly Force Quit Mac. Several strategies can enhance system stability and reduce the likelihood of unresponsive apps. Regular macOS updates ensure that the operating system includes the latest bug fixes, security patches, and performance optimizations. Similarly, keeping applications updated prevents compatibility issues that can trigger freezes.
Monitoring memory and CPU usage is essential. Closing unused applications, reducing browser tabs, and managing resource-intensive applications proactively can prevent system overloads. Managing startup items and background services ensures that only necessary applications consume system resources upon login. For advanced users, monitoring Activity Monitor for high-memory or high-CPU applications provides insight into potential problem areas.
Hardware considerations also matter. Systems with limited RAM or storage are more prone to freezing, especially when running complex applications. Adding memory, optimizing storage, and regularly maintaining disk health can significantly improve stability. By combining proactive software updates, resource management, and hardware optimization, users can greatly reduce the frequency of freezes and the need for force quitting.
Managing Login Items and Background Services
Login items and background services can consume significant system resources, particularly on older Macs or systems running multiple resource-intensive applications. By carefully managing these items, users can prevent slowdowns and minimize the risk of frozen apps. macOS allows users to access login items via System Settings, where unnecessary applications can be disabled from launching automatically.
Background services such as cloud sync tools, automatic backups, and third-party helper apps may also contribute to freezes. Identifying and disabling non-essential services during periods of high system demand can improve overall responsiveness. Advanced users may leverage Terminal commands to inspect running daemons and selectively disable unnecessary processes.
Regularly reviewing login items and background services is a proactive approach that ensures macOS starts cleanly, maintains optimal performance, and reduces the likelihood of application freezes that would require Force Quit Mac. Combining this with system monitoring provides a robust strategy for stability.
Monitoring Memory Pressure
macOS provides memory pressure indicators in Activity Monitor that display the efficiency of RAM usage. High memory pressure is a primary cause of application freezes, as the system struggles to allocate memory to active processes. Understanding how to monitor and respond to memory pressure can prevent unresponsive apps and system slowdowns.
Users can sort processes by memory usage and identify which applications consume the most RAM. Closing non-essential applications reduces memory strain and restores system stability. For power users, analyzing memory usage trends over time can help identify patterns of excessive consumption, such as recurring memory leaks or poorly optimized applications.
By proactively managing memory and responding to high memory pressure, users can maintain a responsive system and reduce the need for emergency Force Quit Mac. Combining this practice with regular software updates, storage management, and CPU monitoring ensures a balanced and stable computing environment.
Dealing with Apps That Constantly Freeze
Some applications have a tendency to freeze repeatedly, even after updates and normal Force Quit Mac procedures. This is often caused by corrupted preferences, incompatible plugins, excessive resource consumption, or inherent software bugs. Identifying the root cause is crucial to prevent frequent interruptions and potential data loss.
A practical first step is to check whether the app is up to date. Developers often release patches to resolve bugs that cause freezing, so maintaining the latest version reduces instability. If the problem persists, clearing the app’s cache and preference files can resolve conflicts that accumulate over time. On macOS, preference files are stored in the ~/Library/Preferences/ directory, and cache files in ~/Library/Caches/. Deleting these files can reset the application to a clean state without affecting user data.
For more persistent issues, consider disabling third-party plugins or extensions that may interfere with normal operations. Applications such as web browsers, creative software, or productivity tools often have multiple extensions, and even one poorly optimized extension can cause repeated freezes. Advanced users may monitor CPU and memory usage in Activity Monitor while the app is running to identify resource-heavy processes. This analysis allows for targeted interventions, such as reducing open tabs, lowering rendering settings, or closing unnecessary background processes.
In extreme cases, reinstalling the application entirely may be necessary. Uninstalling ensures that corrupted files or conflicting configurations are removed, providing a fresh installation that is less prone to freezing. Regular system maintenance, such as clearing temporary files, optimizing disk space, and monitoring startup items, also contributes to long-term stability. By systematically addressing the causes of recurring freezes, users can minimize the need for emergency force quits while maintaining a smoother workflow.
Handling Browser Freezes
Web browsers are among the most commonly affected applications when it comes to freezing. Multiple open tabs, heavy JavaScript, memory-intensive websites, and browser extensions can all contribute to unresponsiveness. Force quitting a browser stops all tabs and processes, but it may lead to the loss of unsaved data or form entries. Understanding how to handle browser freezes efficiently is crucial for maintaining productivity.
The first step is to identify whether the freeze is isolated to a single tab, an extension, or the entire browser. If a single tab is frozen, closing it using browser-specific task managers (e.g., Chrome’s “Task Manager” accessible via Shift + Esc) can resolve the issue without affecting other tabs. For entire browser freezes, force quitting through the keyboard shortcut, Dock, or Activity Monitor is often necessary.
Advanced users can monitor browser resource usage through Activity Monitor to pinpoint problematic extensions or tabs that consume excessive CPU or memory. Disabling or removing these extensions permanently can prevent future freezes. Additionally, keeping the browser updated ensures compatibility with modern websites and scripts. Using lightweight browsers or limiting concurrent tabs reduces the chance of freezes.
Recovery mechanisms such as session restoration, auto-saved form data, or cloud-synced bookmarks and tabs are also important. After a browser crash or force quit, most modern browsers prompt users to restore previous sessions, minimizing data loss. Combining proactive monitoring with browser-specific recovery strategies ensures that freezes are handled effectively while minimizing disruption.
Recovering Unsaved Work After Force Quit
Force quitting applications carries a high risk of data loss, but modern macOS applications often include mechanisms for recovering unsaved work. Many productivity apps, including Microsoft Office, Apple Pages, Keynote, and creative software like Adobe Photoshop, utilize auto-save and version history to restore content after unexpected termination. Familiarity with these recovery options is essential to minimize loss when a Force Quit Mac is unavoidable.
After restarting the application, look for prompts indicating that a recovered version is available. In some apps, unsaved files are stored in temporary directories or in cloud storage, enabling restoration even if the local copy is lost. Advanced users may also navigate manually to auto-save locations. For example, Office apps store unsaved documents in specific system directories that can be accessed if automatic prompts fail.
Understanding version history features further reduces the impact of data loss. Many apps maintain multiple snapshots of files, allowing users to revert to a previous version if recent changes are lost. Cloud synchronization, such as iCloud, OneDrive, or Google Drive, adds an additional layer of protection by ensuring that recent versions of files are preserved externally.
Regularly enabling auto-save, performing frequent manual saves, and using versioned cloud storage are proactive measures that prevent critical data loss. Combining these strategies with disciplined workflow habits ensures that force quitting, while sometimes necessary, does not result in catastrophic loss of work or productivity.
Using Auto-Save and Version History Wisely
Auto-save and version history are underutilized features that provide a safety net during system freezes and Force Quit Mac. Auto-save automatically saves progress at predefined intervals, reducing the risk of losing data when applications become unresponsive. Version history, on the other hand, maintains multiple snapshots of documents, allowing users to revert to previous states if needed. Understanding how to leverage these features effectively ensures better resilience against unexpected application termination.
For optimal use, configure auto-save intervals in all critical applications to the shortest practical period without impacting performance. Some creative applications allow saving multiple backups or auto-saving to external storage locations, which is especially useful in professional workflows. Version history should be regularly reviewed to understand which versions are available and how to revert changes without confusion.
Integrating cloud services into auto-save and version history further strengthens protection. Cloud platforms maintain copies of documents, providing redundancy even if the local device experiences hardware failure. Professionals working with sensitive or large files should ensure that cloud sync is enabled and reliable. Regularly testing recovery mechanisms, including auto-save and version history, prepares users for scenarios where force quitting is necessary, ensuring that critical work is preserved.
macOS Differences Across Hardware Generations
Force quitting and system responsiveness can differ significantly between Intel-based Macs and Apple Silicon Macs. Apple Silicon devices, such as M1 and M2 models, feature unified memory architecture and improved process handling, allowing faster recovery from frozen applications. On older Intel-based Macs, memory fragmentation and resource bottlenecks may cause Force Quit Mac to take longer or require more aggressive intervention.
While the methods for Force Quit Mac remain consistent—using shortcuts, Dock options, Activity Monitor, or Terminal—the behavior and speed of process termination vary by hardware. Apple Silicon devices generally handle background threads more efficiently, reducing the chance of freezes during intensive tasks. Users should be aware that some legacy applications may not be fully optimized for Apple Silicon, which can lead to more frequent freezes and require a deeper understanding of advanced force quit methods.
Understanding these differences helps users tailor their troubleshooting approach. For example, monitoring memory pressure and CPU usage is more critical on older hardware, while Apple Silicon users may focus more on identifying software-specific issues. By factoring in hardware capabilities, users can optimize both prevention and recovery strategies.
Why Some Apps Take Longer to Force Quit
Not all applications terminate at the same speed during a force quit. Apps performing intensive operations, such as video rendering, large data processing, or network-heavy tasks, may require extra time for the system to safely terminate associated processes. System-level dependencies and background threads also influence Force Quit Mac speed.
Applications with complex memory allocation or active disk writes may temporarily resist termination signals. For instance, an application writing large files to the disk cannot be terminated instantly without risking corruption, so macOS may delay the process to ensure data integrity. Additionally, apps with multiple background processes may require sequential termination of each component.
Power users should monitor resource usage to anticipate which applications are likely to take longer to quit. Activity Monitor provides insights into CPU spikes, memory consumption, and disk activity, allowing users to determine whether patience or more advanced methods, such as Terminal commands, are necessary. Understanding these factors prevents frustration and ensures proper handling of unresponsive applications.
Force Quitting Without a Keyboard
Force quitting typically relies on keyboard shortcuts, but there are scenarios where a keyboard is unavailable. In such cases, the Apple menu or Dock methods become essential. The Apple menu provides a visual Force Quit option accessible entirely with a mouse or trackpad. Similarly, holding Option and right-clicking an application icon in the Dock presents the Force Quit option without any keyboard input.
Accessibility tools, such as voice commands or screen navigation software, can also facilitate force quitting without a physical keyboard. Users who rely on alternative input methods should familiarize themselves with these workflows to maintain control during freezes. Combining mouse-based navigation, on-screen menus, and system accessibility features ensures that all users can force quit applications effectively, even in the absence of a keyboard.
Accessibility-Friendly Force Quit Methods
macOS includes built-in accessibility features that allow users with mobility or vision challenges to force quit applications. VoiceOver, Siri, and other assistive technologies provide alternative ways to navigate menus and terminate unresponsive apps. For instance, using Siri to open the Force Quit Applications window or selecting an app through VoiceOver allows for hands-free intervention.
Keyboard remapping and on-screen controls further enhance accessibility. Users can create custom shortcuts or assign gestures to force quit actions, providing flexibility for different needs. Training users on these methods ensures that system freezes do not prevent essential tasks from being completed, promoting inclusivity while maintaining productivity.
Troubleshooting Touchpad and Mouse Issues
In some situations, force quitting is hindered by unresponsive input devices, such as a frozen touchpad or misbehaving mouse. Disconnecting and reconnecting external devices, or restarting the device using built-in gestures or accessibility commands, can restore temporary control. For MacBooks, using built-in keyboard shortcuts or Trackpad gestures ensures continued operation when peripheral devices fail.
Regular device maintenance, including checking for firmware updates, ensuring proper battery levels, and cleaning input surfaces, prevents recurring issues. Advanced users may leverage Terminal commands or remote management tools to regain control if physical input remains unreliable, allowing force quit actions to be executed despite hardware challenges.
Diagnosing Recurring System Freezes
Frequent system-wide freezes indicate deeper issues beyond individual application crashes. Possible causes include insufficient RAM, failing storage devices, incompatible software, or system configuration errors. Monitoring system logs, checking hardware health, and using diagnostic tools such as Disk Utility or Apple Diagnostics provide insight into recurring problems.
Advanced troubleshooting involves identifying patterns of freezes, such as which applications or processes trigger the issue, memory usage spikes, or network-related freezes. By addressing root causes rather than repeatedly force quitting, users can enhance long-term system stability and prevent repeated interruptions.
Maintaining System Health to Avoid Force Quit Situations
Regular system maintenance reduces the likelihood of freezes and the need for force quitting. This includes keeping macOS and applications updated, monitoring disk health, managing memory usage, and minimizing startup items. Scheduling regular cleanups of cache files, temporary data, and unnecessary applications ensures the system runs efficiently.
Professional users can also implement monitoring scripts or third-party utilities to track system performance over time. Identifying trends in CPU, memory, and disk usage allows preemptive actions before freezes occur. Maintaining system health is the most effective strategy to minimize disruptions and ensures a smoother, more reliable macOS experience.
Best Practices for Professional Users
Power users, such as designers, developers, and IT professionals, often run multiple resource-intensive applications simultaneously. Understanding the hierarchy of Force Quit Mac methods, from keyboard shortcuts to Terminal commands, allows for quick resolution without affecting critical processes. Regular monitoring of resource usage, memory pressure, and background tasks is essential to prevent system freezes.
Advanced strategies include setting up automated backups, utilizing versioned cloud storage, and creating scripts to quickly terminate unresponsive processes safely. Professionals can also leverage remote administration tools to manage unresponsive systems efficiently, reducing downtime and preserving productivity. Following these best practices ensures that Force Quit Mac methods are effective and minimally disruptive.
Creating a Personal Emergency Checklist
Having a personal emergency checklist for unresponsive applications saves time and reduces stress. The checklist should outline step-by-step procedures, starting with the least aggressive method, such as using the keyboard shortcut or Dock, progressing to Activity Monitor and Terminal commands, and finally force restart if all else fails.
Including details such as backup locations, auto-save procedures, and recovery steps for unsaved work ensures that critical tasks are protected. Reviewing and practicing this checklist periodically familiarizes users with emergency workflows, enabling rapid response during unexpected freezes.
Teaching Force Quit to Non-Technical Users
Educating non-technical users on safe force quit practices is essential for preventing system damage and data loss. Simple explanations, visual guides, and step-by-step instructions allow users to regain control without confusion. Teaching one reliable method, such as the keyboard shortcut or Dock option, is often sufficient for everyday use.
Advanced explanations, such as the difference between quitting and force quitting, can be introduced gradually to build confidence. Providing quick reference sheets or diagrams ensures that users have accessible guidance when needed, reducing reliance on technical support and promoting independent problem-solving.
Summary of Safe Force Quit Strategy
The safest approach to force quitting involves a hierarchy of methods. Begin with keyboard shortcuts or Dock options, escalate to Activity Monitor or Terminal commands if necessary, and reserve force restart for extreme situations. Monitoring system health, maintaining updated software, and implementing recovery mechanisms such as auto-save and version history further enhance safety.
Professional users should integrate Force Quit Mac strategies into broader workflow management, including monitoring resource usage, performing regular maintenance, and maintaining backups. Following this structured approach minimizes risks, preserves data integrity, and ensures efficient recovery from application freezes.
Final Thoughts on Mastering Force Quit on Mac
Mastering Force Quit Mac techniques is a critical skill for both casual and professional Mac users. By understanding how macOS manages processes, identifying common causes of freezes, and learning multiple methods to regain control, users can handle system freezes confidently. Combining basic and advanced force quit methods with preventive measures, accessibility features, and recovery strategies ensures a seamless and productive experience. Mastery of these techniques not only enhances workflow efficiency but also safeguards important work, making it an indispensable component of effective Mac usage.